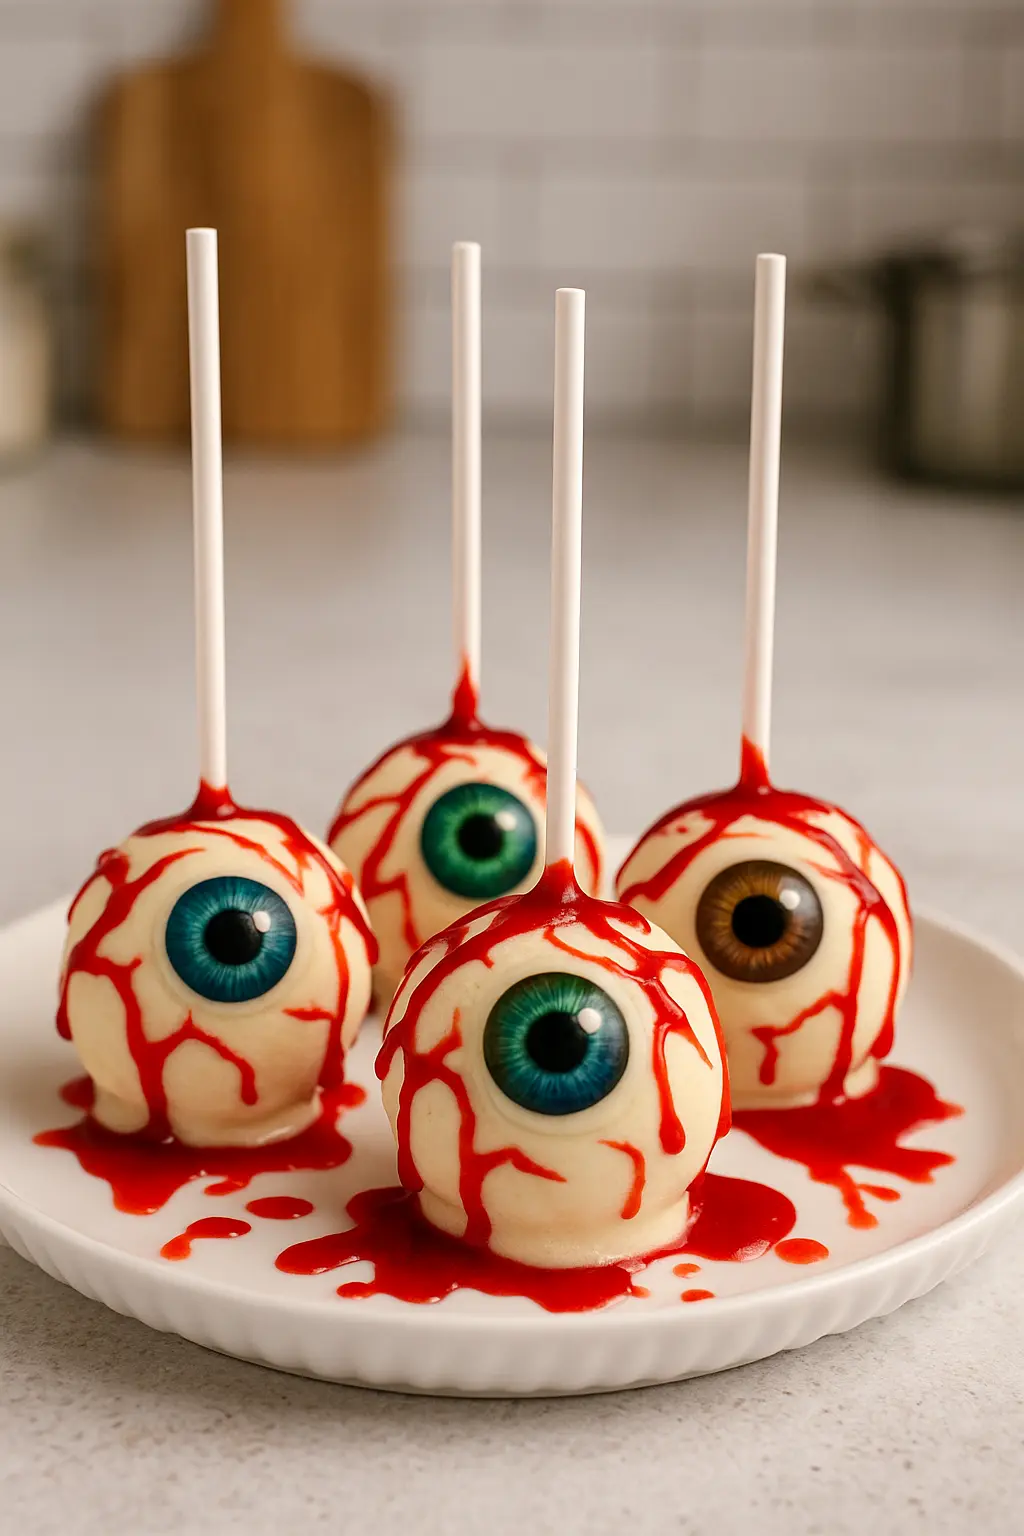
Bloody Eyeball Cake Pops: A Gory Delight With a Sweet Bite
Every Halloween, my grandmother would turn our kitchen into a spooky candy lab. Among the creepy creations she made, nothing was more memorable than her bloody eyeball cake pops. These haunting little treats looked terrifying on the outside but were moist, sweet, and completely addictive on the inside. Inspired by classic American Halloween parties and her love of creative baking, this recipe has become a Halloween essential in our family.
The fun of biting into a bloody eyeball cake pop comes not just from the soft cake interior but from the moment of spooky surprise that hits your guests. Whether you’re hosting a haunted house bash or just looking to spook your coworkers, bloody eyeball cake pops are a chilling addition to any dessert table.
These cake pops don’t just look the part. They are incredibly tasty too. Moist cake, creamy frosting, and a sweet candy shell combine for a treat that’s as delicious as it is terrifying.
Why You’ll Love These Bloody Eyeball Cake Pops
Bloody eyeball cake pops are the ultimate Halloween showstopper. Not only do they look spooky, but they are also fun to make with kids and friends.
- Perfect for Halloween parties or horror-themed events
- Easy to customize with different flavors and colors
- Fun and engaging for kids to help decorate
- Make-ahead friendly and ideal for party trays
- Guaranteed to get compliments and a few screams
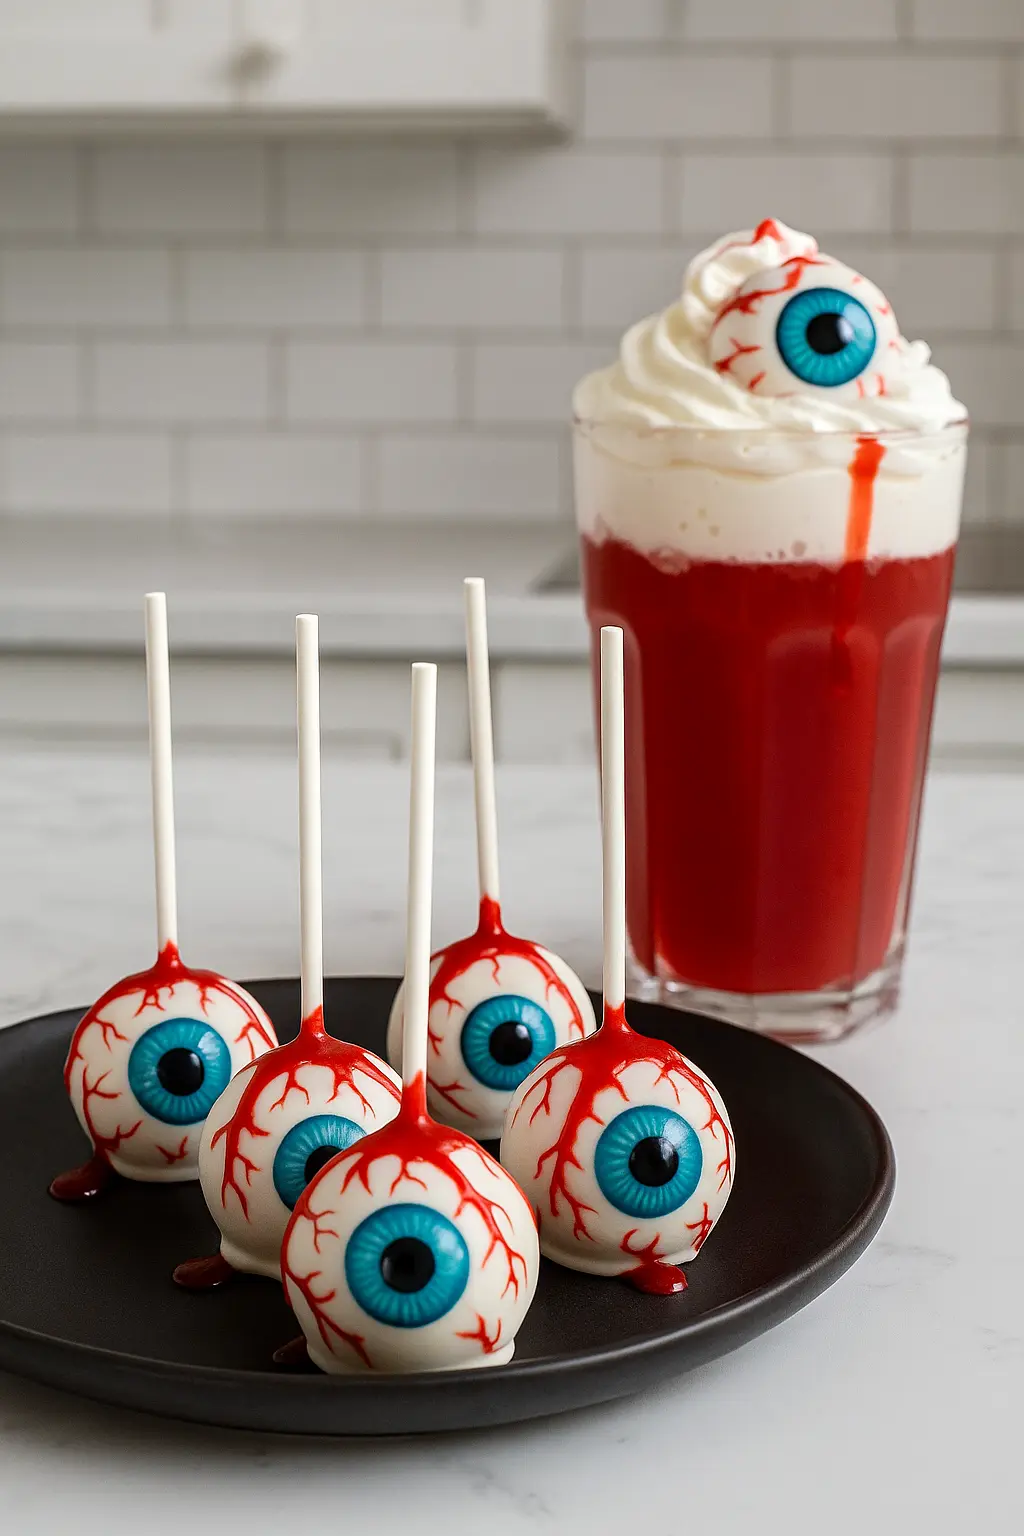
From their gooey, red velvet insides to their glossy white chocolate shells and bloody red veins, these cake pops are as fun to make as they are to eat.
Ingredients
For the Cake Base
- 1 box of red velvet or vanilla cake mix (plus ingredients listed on the box)
- 1/2 cup of cream cheese frosting
For the Decoration
- 300 grams of white candy melts or white chocolate chips
- 50 grams of black or dark chocolate chips (for pupils)
- Red gel food coloring or edible blood gel
- Candy eyes (optional but recommended)
- Lollipop sticks
- A block of styrofoam for drying
Tools Needed
To make bloody eyeball cake pops successfully, you’ll need the following:
- Baking tray
- Mixing bowl
- Electric mixer or spoon
- Parchment paper
- Microwave-safe bowls
- Toothpicks
- A scoop or spoon
- Lollipop sticks
- Styrofoam for setting cake pops upright
How to Make Bloody Eyeball Cake Pops
Step 1: Bake and Cool the Cake
Follow the instructions on your cake mix box. Once baked, let the cake cool completely. Crumbling it while warm can make it mushy and hard to work with.
Step 2: Crumble the Cake
Break the cooled cake into crumbs using your hands or a food processor. Place the crumbs into a large mixing bowl.
Step 3: Mix With Frosting
Add the cream cheese frosting to the cake crumbs. Mix until you get a dough-like consistency. This step is essential. The mixture should stick together easily when rolled.
Step 4: Roll Into Balls
Scoop out about a tablespoon of the dough and roll it into a ball. Repeat until all the mixture is used up. This should make about 12 bloody eyeball cake pops, perfect for serving six guests.
Step 5: Insert Sticks and Chill
Dip the tip of each lollipop stick into melted white chocolate before inserting it halfway into the cake balls. This helps secure the stick. Chill the cake balls in the fridge for at least an hour.
Step 6: Coat the Cake Pops
Melt the white chocolate or candy melts in the microwave in 30-second intervals, stirring between each. Once smooth, dip each chilled cake pop into the coating. Tap gently to remove excess.
Step 7: Decorate the Eyeballs
While the coating is still wet, press a candy eye into the center of each cake pop. If you’re not using candy eyes, use melted dark chocolate to pipe a pupil in the center.
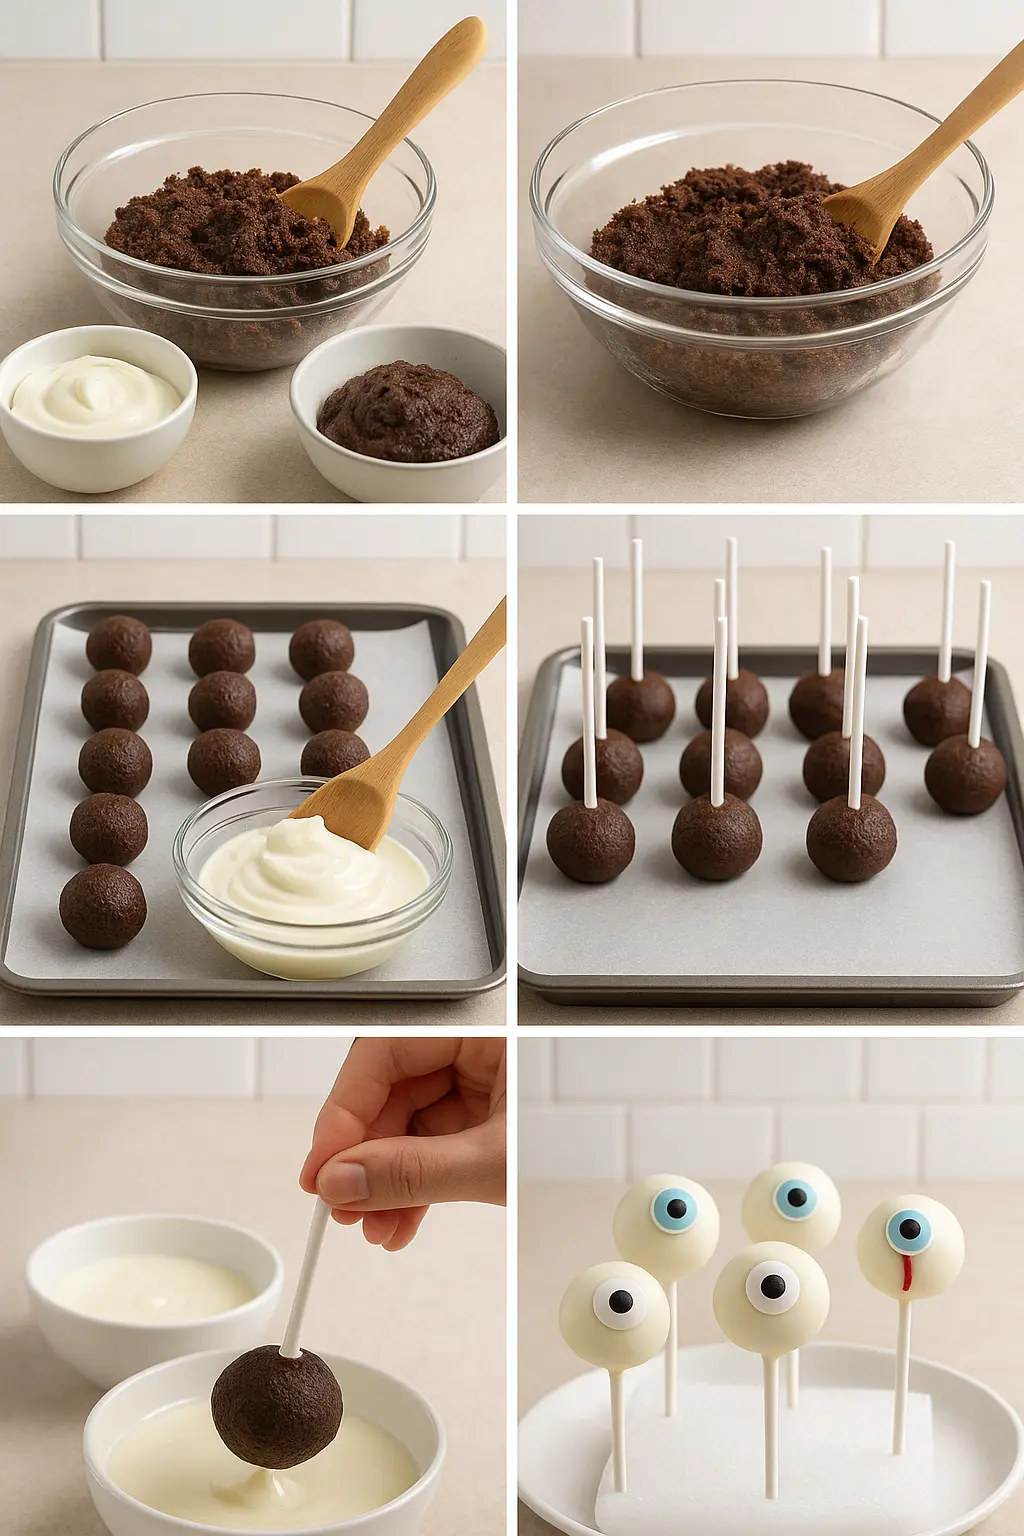
Dip a toothpick into red gel and draw bloodshot veins radiating from the pupil. You can be as creative or gory as you’d like here. The goal is to make each pop look like a gruesome, realistic eyeball.
Step 8: Let Them Set
Stick the bloody eyeball cake pops upright in your styrofoam block and allow them to set completely at room temperature or in the fridge.
Variations
- Jam-Filled Centers: Inject strawberry or raspberry jam into the center of each cake ball for a surprise “bloody” bite.
- Different Cake Flavors: Chocolate or pumpkin spice cake also works well.
- Glowing Eyes: Use glow-in-the-dark edible paint or neon candy melts for eerie party lighting.
- Eyeball Skewers: Arrange multiple eyeballs on long skewers for a dramatic centerpiece.
Tips for Success
- Make sure the cake is fully cooled before crumbling.
- Don’t add too much frosting, or the balls will be too soft to hold their shape.
- Chill the cake balls before dipping to keep them from falling apart.
- Always tap off extra chocolate to prevent drips.
- Let the coating cool a bit before dipping to avoid melting the cake.
Storing and Making Ahead
You can make these bloody eyeball cake pops in advance and store them easily:
- Store in an airtight container in the fridge for up to 5 days.
- You can freeze undecorated cake balls for up to a month. Just thaw and decorate before serving.
- Keep away from heat or moisture to avoid melting the candy coating.
Fun Ways to Present Them
- Place them in a black tray surrounded by fake cobwebs.
- Add LED lights underneath the tray for an eerie glow.
- Stick them into a pumpkin for a creepy edible bouquet.
- Wrap each bloody eyeball cake pop in clear cellophane and tie with red ribbon for party favors.
Nutritional Information (Per Pop, Approximate)
| Nutrient | Amount |
|---|---|
| Calories | 210 |
| Sugar | 17g |
| Fat | 9g |
| Protein | 2g |
| Carbs | 26g |
Party Planning With Bloody Eyeball Cake Pops
When planning a Halloween party, desserts are often the most memorable part of the table. Bloody eyeball cake pops not only satisfy a sweet tooth but also become a conversation starter. Guests are often hesitant to bite into something that looks so realistic, which only adds to the fun.
These treats are ideal for Halloween-themed dessert buffets, horror movie nights, haunted house setups, and even school bake sales if you want to thrill the crowd. Arrange your bloody eyeball cake pops upright in carved-out pumpkins or spooky foam skull heads for extra visual appeal.
You can also label them creatively. Use small chalkboard signs with messages like “Don’t Blink” or “One Last Look.” These small touches turn a simple dessert into a memorable display.
Kid-Friendly Halloween Treats
If you’re making bloody eyeball cake pops for kids, consider using less detailed decorations for a slightly less scary presentation. Instead of red gel, try edible glitter or fun Halloween sprinkles around the eyeball. The pops still keep their theme without being too realistic.
Invite your little helpers into the kitchen. Kids love rolling cake balls and decorating their own eyeballs. It becomes a fun activity and helps them get involved in the Halloween spirit. Provide different colored candy melts so they can make blue, green, or even glowing neon eyes.
Make sure to supervise while melting chocolate and handling food coloring to keep the kitchen safe and clean. Bloody eyeball cake pops also make great edible art projects during Halloween-themed playdates.
Read more : https://chefnip.com/sloppy-joe-recipe/
Adapting the Recipe for Special Diets
For guests with dietary needs, it’s easy to adjust your bloody eyeball cake pops to fit gluten-free or dairy-free diets.
- Use a gluten-free cake mix and certified gluten-free frosting.
- Replace cream cheese frosting with dairy-free alternatives made from almond or coconut milk.
- Choose dairy-free candy melts or vegan chocolate chips for coating.
- Use naturally colored decorations to avoid artificial dyes if allergies are a concern.
Even with these substitutions, your bloody eyeball cake pops will retain their spooky charm and delicious flavor.
How to Sell Bloody Eyeball Cake Pops
If you run a home bakery or participate in local craft markets, these treats are a seasonal goldmine. People love themed desserts, especially those that look as creative and creepy as bloody eyeball cake pops.
Package them individually in clear treat bags tied with Halloween ribbon. Add a custom label with your bakery name and flavor details. Offer variety packs with different cake flavors or fillings. Some customers may want less gore, so keep a mix of mild and extreme designs.
Bloody eyeball cake pops also do well in themed dessert boxes, especially during October. Combine them with mini cupcakes, candy corn cookies, and chocolate-covered pretzels shaped like bones. Market your set as a “Fright Night Dessert Box.”
Make sure to take professional photos of your bloody eyeball cake pops for your website or social media. Focus on clean, high-contrast backgrounds that make the pops stand out. Tag local hashtags and use Halloween-related keywords to reach more customers.
How to Transport and Serve Them
To safely transport your bloody eyeball cake pops:
- Place each pop in a small cake pop holder or use a box with holes for stability.
- If you don’t have a holder, place small marshmallows around the base to keep them upright.
- Keep them cool during travel to prevent melting. A cooler bag with ice packs works well.
When serving at your event, stand the pops in decorated foam blocks or Halloween mugs filled with black beans or candy corn. These holders help them stand up and become a centerpiece.
If you’re going buffet style, include small napkins or mini plates next to them for mess-free enjoyment. Although bloody eyeball cake pops are finger-friendly, they can get sticky once bitten into.
Bloody Eyeball Cake Pops for Adults
Want to take things to the next level? Make a grown-up version of bloody eyeball cake pops with boozy centers. Inject a tiny bit of liqueur like cherry schnapps or Irish cream into the center of each cake ball before dipping in chocolate. Just remember to label these clearly so kids don’t grab the wrong one.
For an elegant Halloween party, pair these adult versions with dark wine or themed cocktails like “Bloody Sangria” or “Witch’s Brew.” Display them on black slate boards or gold-plated trays for a dramatic twist.
Bloody eyeball cake pops may be creepy, but that doesn’t mean they can’t be classy.
The Science of the Perfect Pop
A few baking science tips can elevate your bloody eyeball cake pops from good to great:
- Use room temperature frosting when mixing with the cake crumbs. Cold frosting can clump, making the dough uneven.
- Chill the shaped cake balls long enough before dipping, but not so long that they crack when coated.
- White candy melts give better coverage than white chocolate. They’re easier to melt and less likely to seize.
- To get a smooth coating, keep the candy melts warm but not hot. Stir frequently to maintain consistency.
If your coating is too thick, add a tiny amount of vegetable shortening or coconut oil to thin it slightly. This helps create that perfect eyeball finish.
More Themed Variations
Once you’ve mastered bloody eyeball cake pops, the possibilities for themed cake pops are endless.
- Monster Eyeballs: Add green or purple coloring and pipe tentacles around the pupil.
- Cyclops Cake Pops: Use extra-large candy eyes and make them with double cake scoops.
- Zombie Eyes: Add edible slime or green icing oozing from the sides.
- Gothic Elegance: Use black candy melts and edible glitter for a more stylish spin.
Don’t be afraid to get creative with your cake pops. The beauty of bloody eyeball cake pops is that the design allows for fun, horror, and imagination.
Bringing It All Together
Bloody eyeball cake pops combine creativity, flavor, and the joy of Halloween into one fun, bite-sized dessert. They are fun to make, even more fun to serve, and they make your dessert table unforgettable. Whether you’re making them for your kids, your friends, or your customers, bloody eyeball cake pops will always be the spooky centerpiece people remember.
Take your time, follow the tips, and don’t be afraid to add your own twist. From horror-themed birthdays to school Halloween fairs, these gory little goodies will make an impression.
So go ahead and make your batch of bloody eyeball cake pops. Let your imagination bleed a little. It’s Halloween, after all.
FAQ
What is the trick to making cake pops?
The trick is to mix crumbled cake with just enough frosting to hold the mixture together without making it too wet, then chill the balls before dipping to help them keep their shape.
What is a good binder for cake pops?
Frosting is the most common binder, but you can also use cream cheese, nut butter, or melted chocolate for added flavor and stability.
Is it better to use almond bark or candy melts for cake pops?
Candy melts are more convenient and come in many colors, while almond bark gives a smoother, firmer coating and sets faster. The choice depends on your desired finish and flavor.
What do raccoon cake pops taste like?
“Raccoon” cake pops are usually a fun design theme, not an actual flavor—they taste like whatever cake and coating you use, often chocolate or vanilla.
What not to do when making cake pops?
Avoid adding too much frosting (they’ll be mushy), skipping the chilling step (they’ll fall apart), or overheating your coating (it will seize or clump).
Should cake pops be cold before dipping?
Yes, chilling them for at least 30 minutes helps them stay firm and hold their shape during dipping.
Are cake pops indica or sativa?
Cake pops are a dessert, not a cannabis product—unless made as an edible. In that case, the strain type would depend on the cannabis used in the recipe.